Line of action gives direction, force, and clarity to your poses. It also helps direct your audience’s eye to where they need to be looking. Taking today’s “Zootopia” teaser, which without any background elements, relies on the characters themselves to direct us around the frame.
I usually just wing it kinda ehehe but I always start off with a basic sketch to get my idea of how I want my body posed and proportioned (I’m using the default marker tool for this)
Then I ‘refine’ and thicken out the sketch so it’s lookin more like a body
Then I add on clothes on top of the sketch, just to get an idea of where I want things, it dosen’t need to be pretty. For clothes and such, pay attention to parts that fold more often then others, especially at joints and such.
Okay! Now we have out sketch done and we’re gonna go into lineing. Create a new layer and set the sketch layer down opacity (Remember to line on the TOP layer though, Not the bottom like it looks here)
I work with two different line tools one for thinner lines and one for thicker/filling in lines. Both can be used for lineing on their own so use whichever one is more comfortable
Then you line on top of your sketch layer (in the new layer on top, you dont wanna do it on the same layer or it will just be messy and you’ll most likely have to do it over again)
Then you hide/get rid of the sketch layer and viola! How I do my linework~ (You can also take the marker tool with a light grey and put in some shadows to where you think you wanna shade to give it more depth)
And thats how I do my sketches/linework! I know it might not be super helpful but t might give you and idea~
Someone asked that this be rebloggable so HURR YOU GO
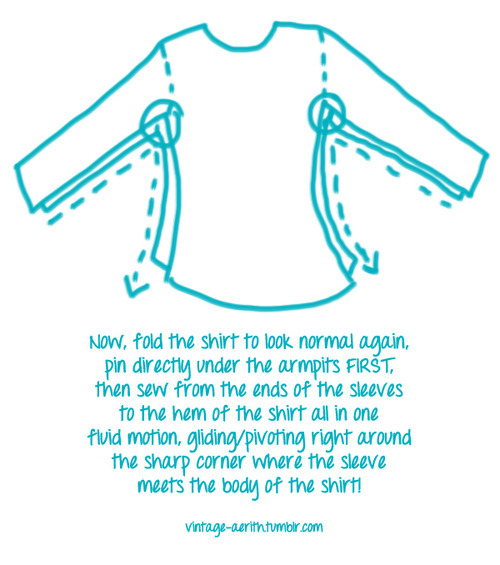
Patterns are really dumb in telling you to finish the body of an outfit, then finish the sleeve, then attach a circle to a circle. It’s possible to do, don’t get me wrong, but unless you have a lot of experience it’s sometimes very aggravating trying to evenly distribute the sleeve around the “hole” cut out for it and match up the seams under the armpit!
(Please note…some patterns, especially to achieve tailored looks, require you to do it the traditional way. Don’t use this method for fashion school assignments or super-complex garments as it will probably screw up the way it ends up fitting in the end. This is mostly for the use of cosplayers to make their job a little easier.)
SO THIS IS WHAT I DO.
PLEASE DO NOT REMOVE SOURCE OR REPOST, THANK YOU
This is a great tutorial; it’s how I always attach my sleeves! C: (and it’s actually a legit way to do it, it’s how we made our mens’ shirts in my fashion class, haha. As long as you finish it with a nice seam it’ll work!)
I always find sleeves the most troublesome thing to draft/modify, so this is awesome!
will this help? it’s just my own way of doing things though, and using references really helps too; it’s hard to draw from memory alone. also, knowing the 7 or 8 head proportion of the body is useful as well
When it comes to creating characters, sometimes it’s easy to let them slip into the same old stock standard set of body types. Basically clones with a few props, hairdos and make up to spice things up a bit. After a while, having the same actor play dress up for every character gets kinda boring…
It’s tough to break the habit too, especially when you’re taught a single set way to draw. Not to say having a solid construction method is ever a bad thing, as long as it doesn’t confine your creativity.
Check out these nifty tips and pointers by jeinu to give each of your comic book characters their own a unique flavour of memorable originality.
First off, I gotta start off with the typical Disclaimer.
*ahem*
This is a tutorial based off of MY knowledge and MY experience. My advice is just that, advice, and is not is anyway, shape or form, absolute. I am still learning and do not consider myself a professional or expert. Look at other sources, look at other materials, expand your inspiration, don’t just look at this tutorial and call it good. And most importantly have fun~
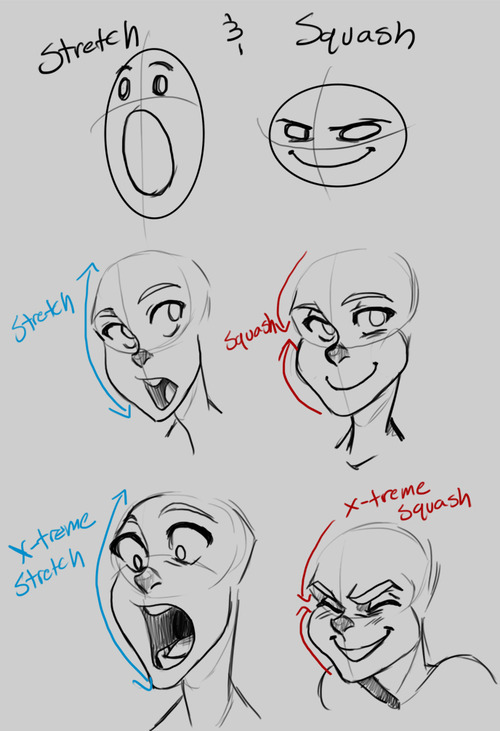
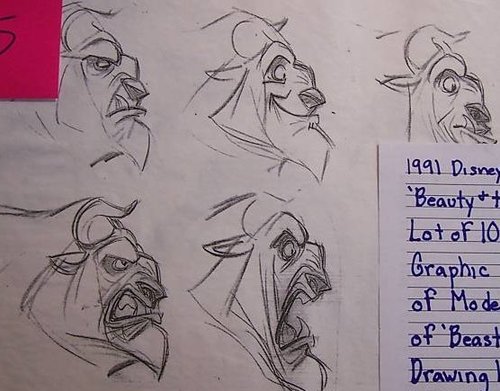
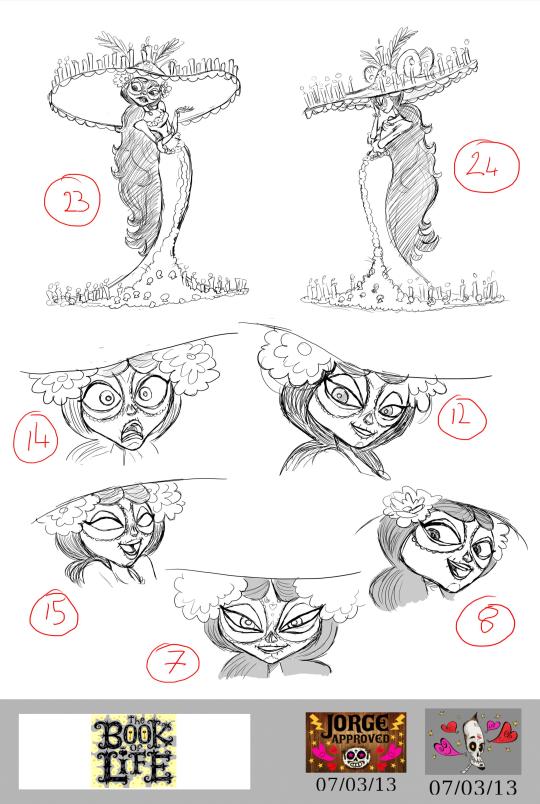
Alright, with that out of the way, before I can get to the actual expressions, we need to discuss an important concept known as “Squash and Stretch.” You’ve probably heard of it before. Squash and Stretch was a method that was invented (I use this term a bit loosely) by Freddie Moore, a Disney animator from the 1930s to 1940s. He was the animator for the Dwarves in Snow White and he gave these characters a spongy flexibility that made them feel more real and gave pliability to the face that made them come more alive.
Even outside the world of animation, Squash and Stretch is essential and you’re going to squeeze much more life out of your characters if you understand and are willing to push the weight and flexibility of their faces. This also doesn’t only apply to cartoons, look in the mirror and make funny faces and strange expressions and you’ll notice how squishy your face is.
The next concept to be aware of is the Acting Elements of the Face. This is a concept I never really thought about until I read Tom Bancroft’s Character Mentor, a book I have recommended many times. The Acting Elements are the basics of character expression and focuses on breaking down the elements of the face in order of importance to properly communicate an expression to the audience. These are not set in stone and a lot of times their order can be switched around depending on the expression. This is the default order Bancroft uses in his book:
1) The eyes
2) The eyebrows
3) The mouth
4) The neck
5) The nose
I’m not going to go into much detail about this; otherwise this tutorial will run on forever, so DEFINITELY give Character Mentor a look for a better understanding.
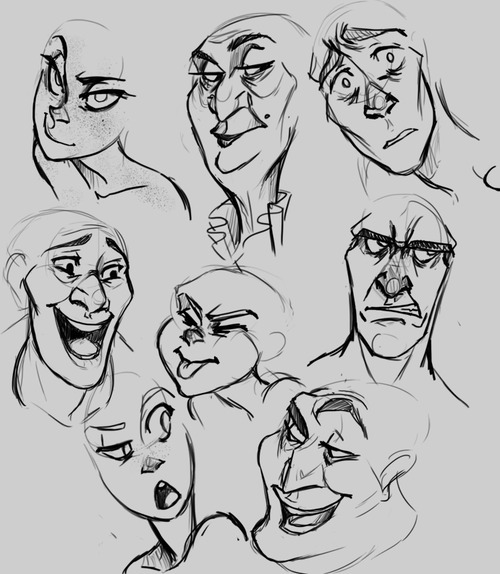
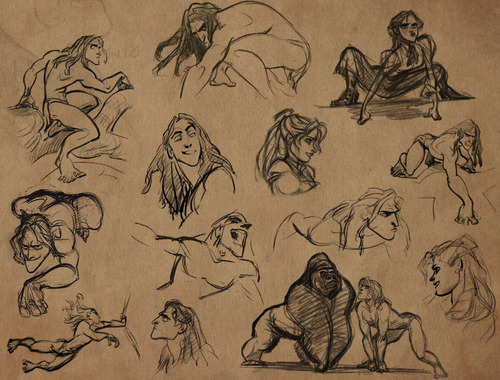
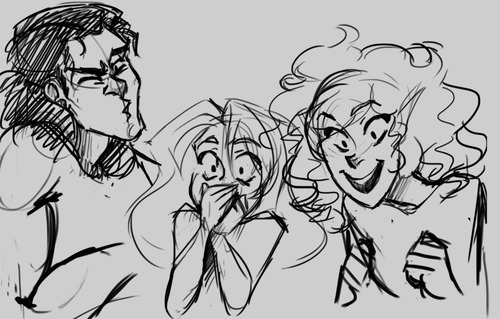
Here are some expressions I whipped up, notice the different ways each of the above elements contributes to the overall expression. Try to identify which element is strongest in each one. Also notice how some elements repeat (such as the use of the eyebrows in the bottom two) but they’re still different expressions.
I personally find that I always build from the eyes out when building an expression. Ever heard the phrase “The eyes are the windows to the soul?” well guess what? THE EYES ARE THE WINDOWS TO THE SOUL! This is why people look away when their embarrassed, why their gaze shifts when they’re lying, why their eyes grow wide in awe. It’s what makes a hero seem cold when they hold their gaze at the display of heartless behavior or gives a villain a moment of redemption when they turn away from a cruelty.
Part of the reason why Glen Keane’s characters are so incredible is the way he expresses a character through their eyes. He says “If you’re going to make a mistake, don’t make it in the eyes. Because everybody’s looking at the eyes.” He creates these characters that are filled with passion and before that passion translates into body language or into an expression, if bursts out through the eyes.
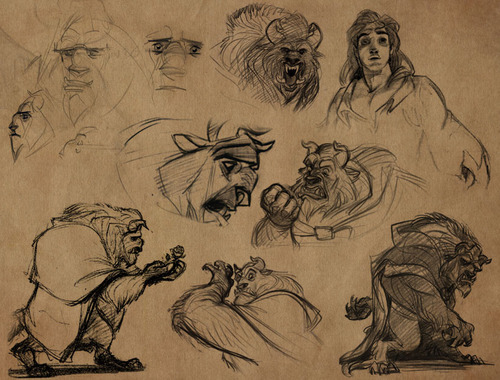
Remember when I brought up that the order of the Acting Elements is flexible? As I said, I tend to start with the eyes when expressing and character but sometimes that just doesn’t “work” with the character. Take a look a Max, from Cats Don’t Dance (if you haven’t seen the film, I highly recommend it, even if just for the animation). His face is almost ALWAYS in the same position, with the same expression, completely stiff. The only thing that moves is his mouth and it’s animated in a way that is both comical and intimidating! This is a common theme with his character, fluid motion against unmoving bulk. It contrasts and guess what? Contrast creates interest! <——Remember this phrase, because it applies to everything!
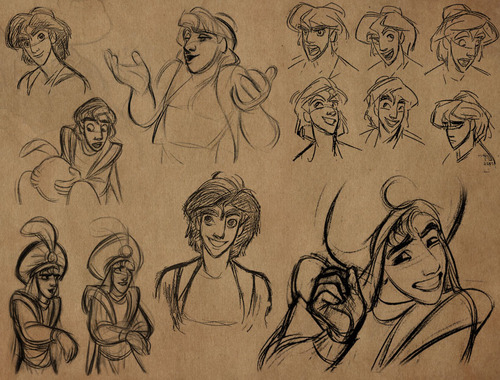
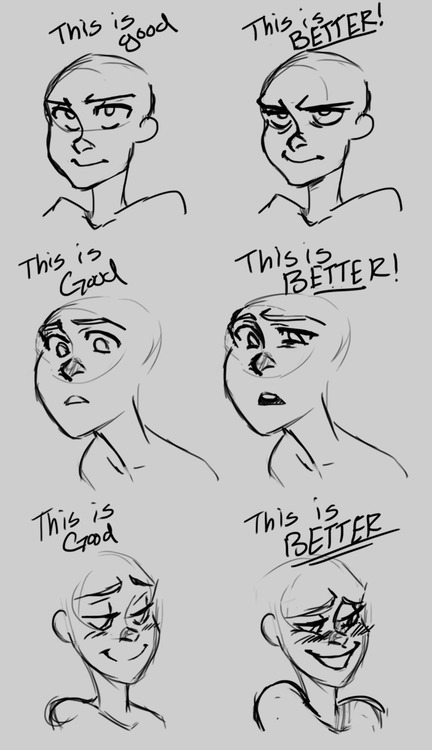
Next, pushing your expressions. Don’t be afraid to add that extra “umph” to a characters expression. Unless you’re animating, you don’t have the luxury of constant motion and steady frames, so make the most of a scene, make it clear to your audience what your character is feeling. Check out some of these simple examples below.
Now some of you probably thought the first expression was better than the second. And you know, you may be right! Sometimes a subtler expression speaks volumes more than a more obvious one. It’s important, however, to understand to how to make the most use of your character’s face. But in the end it all boils down to the character. Which leads me to my final segment of this tutorial…
A character should express themselves through their emotions. Just like costumes, colors, body language, etc. expressions are ultimately a tool used describe a character, to visually tell a story about them. When dealing with different characters, try to avoid “recycling” expressions, ESPECIALLY in the same scene/picture/moment. A good exercise is to draw two or three different characters with the same emotion but give them different expressions.
Or better yet, draw them reacting to the same situation.
Your goal should be to make each expression true to the character. Their expressions should tell the audience something about them. The same way you might bold a word or phrase to emphasize its meaning, a character should express themselves in ways that emphasize who they are.
This is a nice chart! Lipsync is one of my not-so-secret passions. I also hate front mouths. They’re harder to inbetween, I find, and they’re not used nearly as frequently. Here’s some ¾ mouths I made.
These are the basic shapes I was taught, and I use. Standard lipsync shapes;;
You have your closed mouth to open, to clenched teeth, to oohs, and your (often optional) F, L, and TH mouths.
Tips!
Your top teeth don’t move; I mean, stylistically it happens sometimes (Gravity falls does it fairly well, as much as I haaaaate that), but your lipsync will prolly look better if they don’t.
My clenched teeth (SH) mouth is always a bit wider than my biggest AH mouth. It adds variation and helps your shapes blend more nicely. Conversely, my biggest AH mouth is narrower than my SH mouth and my closed (M) mouth.
My L mouth is a tiny bit more closed than my biggest AH, and not as closed as my second biggest AH. It fits between them nicely so that if you have to go from an L to an AH mouth, like you would for the word “Like” or “Love”, it doesn’t pop or look weird.
My R and oo mouths move forward on the face a bit, it adds dimension, and if you leave it all in the same place and have the mouth just shrink into a circle it miiiight look weird.
Aaaaand I think that’s it? Never go from a SH mouth to a TH mouth, it’ll pop and look weird…uhhh;
Also! It’s alright to skip some shapes;;
So below is a lipsync I made using the above shapes;
It’s clear what they’re saying, the mouth is moving nicely, but there’s only one problem. Veeeery rarely do they give you enough time to use all the mouths you want to make it move nice. Voice actors talk fast to fit everything in and holycrap do we hate love them for it.
So here’s a fast one.
Those two gifs should start at the same time, and notice that the second one stops while the first one is still saying “doing”.
I not only cut out the mouth between the biggest AH and the clenched teeth, but I combined the word “Are you” into, like, 3 shapes. I also trimmed some inbetweens overall. The lipsync still reads, though! You can still tell what they’re saying even without audio (which would help it a bit, haha~)
Cutting out that stuff ended the lipsync a whole 14 frames sooner (more than half a second!). It doesn’t sound like much, but with 24 frames per second and dialogue moving at the speed of light, you don’t have time to dilly dally. This isn’t a preschool show;;
Aaaaaand I think that’s it. Liiiipsyyyyyync~~~
Now to go back to actual work and stop talking about things most ppl don’t care about;
I AM CRYING TEARS OF RELIEF BECAUSE I NEED THESE REFERENCES FOR MY SENIOR FILM’S DIALOGUE~
Reblogging this again because I’ve been using this reference for the last 2 months to help with my lip-synch in my film, and I’ve just tested one scene where I used the reference…And my mouth-drawings have improved tenfold ever since.
To the OP who made this chart…I wish I could hug you right now because you helped make my film look much better. c8
This post makes its rounds every so often;; I’m glad people are getting use out of me not wanting to do the actual work I had!