Updated hand ‘tutorial’ more like just style guide / tips!
All I can think of is said, if you have any questions or specific hand gestures- I’m happy to help! References always help. Full res and .pdf available on my Patreon. As always, I hope it helps!
I’ve been seeing a lot of Big Hero 6 concept art and I wanted to set a brush to kind of mimic the graphite style of some of the sketches. I don’t have a “fully functional” version of SAI, so I tried to make this as simple as possible.
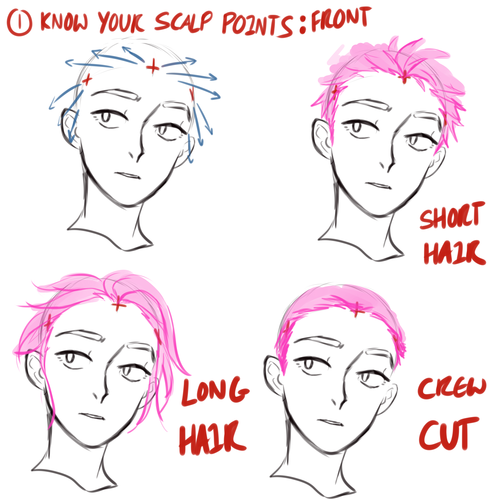
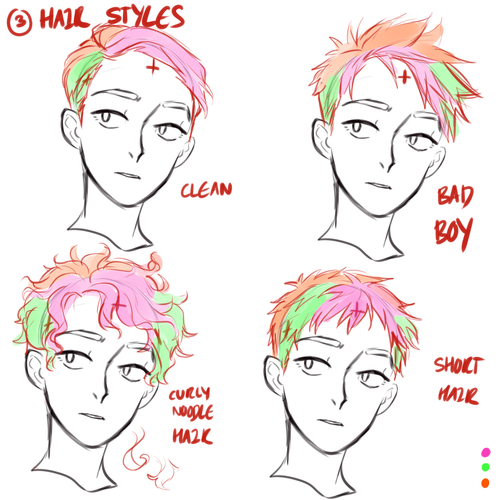
HELLO! I’m not too sure on how to make a hair tutorial since i kinda just go the hell out with it (its really inconsistent it hurts lol). But i’ll try my best!
Scalp points is really important. You would want it to look natural, and from there you can control where your front hair goes. There are 3 main points, one in the middle and the other two by your temples.
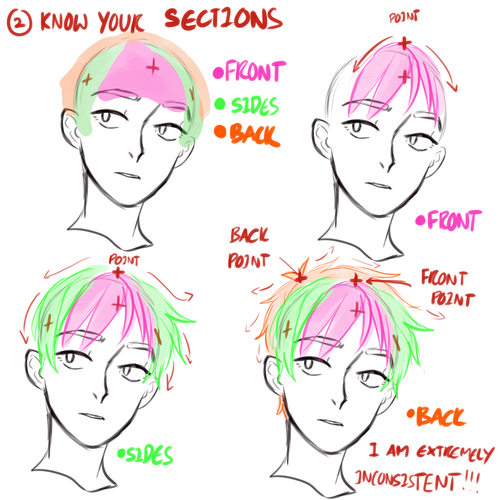
I usually divides my hair sections into 3: the front, sides, and back. YOU DONT REALLY HAVE TO FOLLOW EVERYTHING THOUGH, JUST DO YOUR THANG. I know, my hair structures doesnt make sense with the points and stuffs lmao. But yeah you got my point.
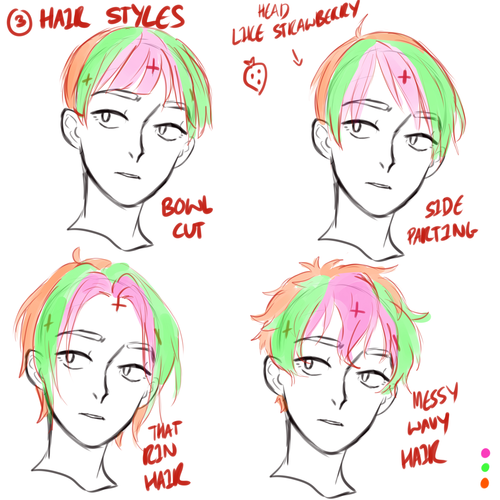
Examples with different hairstyles:
Note to self: do not attempt curly hair if you’ll just fuck things up
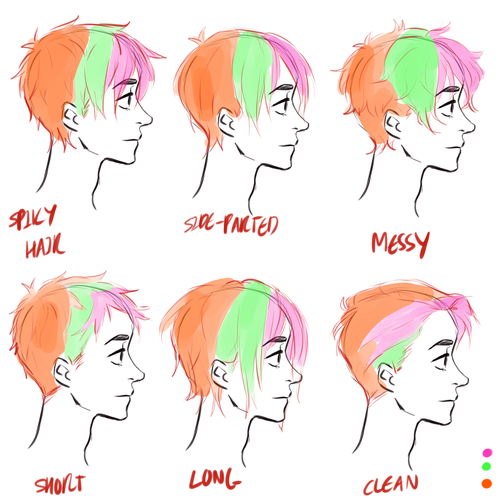
Side view examples:
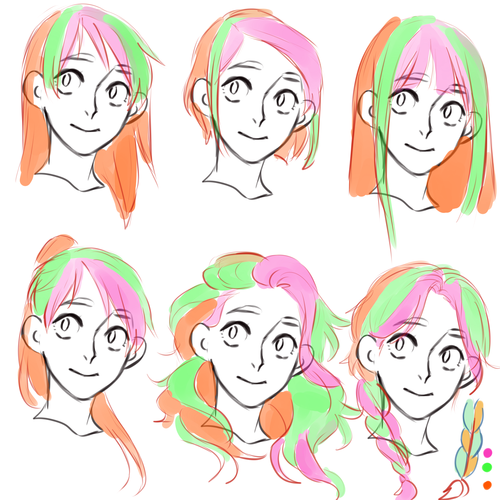
Girls Hair example:
Girls hair doesnt make sense. Just go crazy and make them fabulous queens.
So yeah, thats all i manage to think of. There are great artists out there who make better tutorials than me lmao. Check out kelpls amazing tutorials, or just look at some fancy kpop artists’ hair for reference their hair are amazing
Ah, thank you so much! Sorry for taking so long to respond! Here’s my take on the characters, hopefully this helps!
1. So when I draw them (or anything in general), I start with a line of action to help figure out how to pose them. Then I start roughing out the shape of the heads. The line between their face helps me to pin point where to draw the eyes, nose, mouth, etc! I use a normal brush the opacity set to about 30%.
2. When you draw, everything starts with shapes, so what I did with heads I do the same for the bodies. I rough out the shapes quickly for what I’m going for. Sans is kinda small and chubby and Papyrus is tall and thin, so the shapes you draw should reflect that! Reference is always good! 😀
3. This is where I start sculpting around the shapes and start adding their faces, hands, arms, cheek bones, the details in their clothes, etc. Think of them as smaller shapes on top of shapes, haha. I’ve also began erasing some of the construction lines.
4. I just keep refining the details and erasing the construction lines until… DONE! Since their will always be something I don’t like in my work, I use the transform/warp tool in photoshop to fix some things. Like San’s mouth was too big and I pushed Papyrus’s pose out just a little bit more.
I hope this kind of helps! <:) I know this was kinda fast but that’s usually my process. But don’t get discouraged, practice helps a lot!
Updated hand ‘tutorial’ more like just style guide / tips!
All I can think of is said, if you have any questions or specific hand gestures- I’m happy to help! References always help. Full res and .pdf available on my Patreon. As always, I hope it helps!